Showing posts with label Naviswork mindmap. Show all posts

Wednesday, April 6, 2016

Part 8 - Naviswork - Timeliner

Below is the mindmap of part 8 - Naviswork - Timeliner


i.Configuring appearance

In autodesk naviswork 2012, Autodesk enhanced the way object can appear in your model. In the past, we associate projects with colour overrides or transparency overrides. Autodesk now introduced appearance profiler function. This function allows us to go in by properties to filter information associated to certain properties to filter this subject to associate its information by property or by set.

To update colour to transparency, simply click on the colour in selector > adjust appearance transparency > update


ii.Creating task

To create a simulation of the work progress, we would have to assign task. The task that we put into it will determine what we do in time liner. By doing task assignment, we can actually commence to build our model from ground level, except that it is a virtual model. The idea is to create new tasks > assign time frame to them and select task type.

Workflow for how to import a schedule from project/primavera into naviswork for “timeliner” tool :

1. Create a schedule in Microsoft project or primavera and save the schedule.


2.       Open Naviswork file you wish to import the schedule into.

 3.Under “timeliner” tab, right click and select “add task”.

When link is selected, right click on the link and select “Rebuild Task Hierarchy from Link.” Now the schedule should be listed under the Tasks tab.

 Lesson learned :
1.The schedule can be changed in Microsoft project or Primavera and resaved, then select “rebuild Task Hierarchy from Link” again to update the Timeliner schedule.
2. When appropriately linked, the timeliner can be used to simulate the models construction. If scheduling or sequencing problems with the model or schedule arise, the schedule can be modified and reloaded into Navisworks. 

Adding selection sets to a task

Adding multiple task and running the movie
1. Make sure file.nwd is open and you’re on your Task tab on timeliner.
2. Add Task. Name the new task as “task 1 demo”.
3. Set planned start date and planned end date. 

4. Go to task, right click and attach current selection. Assign task type (construction/demolish?) 
5. Run simulation to make sure everything look okay.


Simulating settings

The speed of movie maybe too fast or too slow. There is possibility you would like to show it daily instead of weekly.

1. Go to task tab to show the entire building.
2. Go to simulate tab > settings > keep the start end dates as they are
3. Interval size , keep it as 5%
4. Playback duration, dump that down to 40 seconds to speed it up a little bit.
5. Go to overlay text, click edit > go to extras > add : active task > ok > run simulation.
6. You will see the percentage of each task displayed by the screen at particular week.


Exporting timeliner
To export movie to video file for presentation.
1.    Go to Simulate tab, export animation.


Adding data source

We can grab something from either Microsoft project, primavera, or even a dumbed down CSV file. The idea is to bring in a CSV file and auto populate as many fields as possible with an actual construction schedule.

1. Open NWD file open, make sure timeline is up and running.

2. Go to data sources > add buttons > Notice you can go with Microsoft Project MPX (CSV file) , or couple different types of Microsoft Projects, Primavera 6 to 8 or P6 down to version 8.3. (in this case, we need a csv file which we will go and prepare first)

3. To prepare a CSV file, go to task tab > “export the schedule” icon > select export CSV > save as test 1 csv file.csv > hit save


4.Go back to data source > add > CSV import > 


Below is our completed timeliner video using Naviswork and Revit. Enjoy ! 

Part 7 - Naviswork - Clash Detection

Below is the mindmap of part 7 - Naviswork - Clash Detection


7. Clash Detection
a. Creating a clash test and setting rules
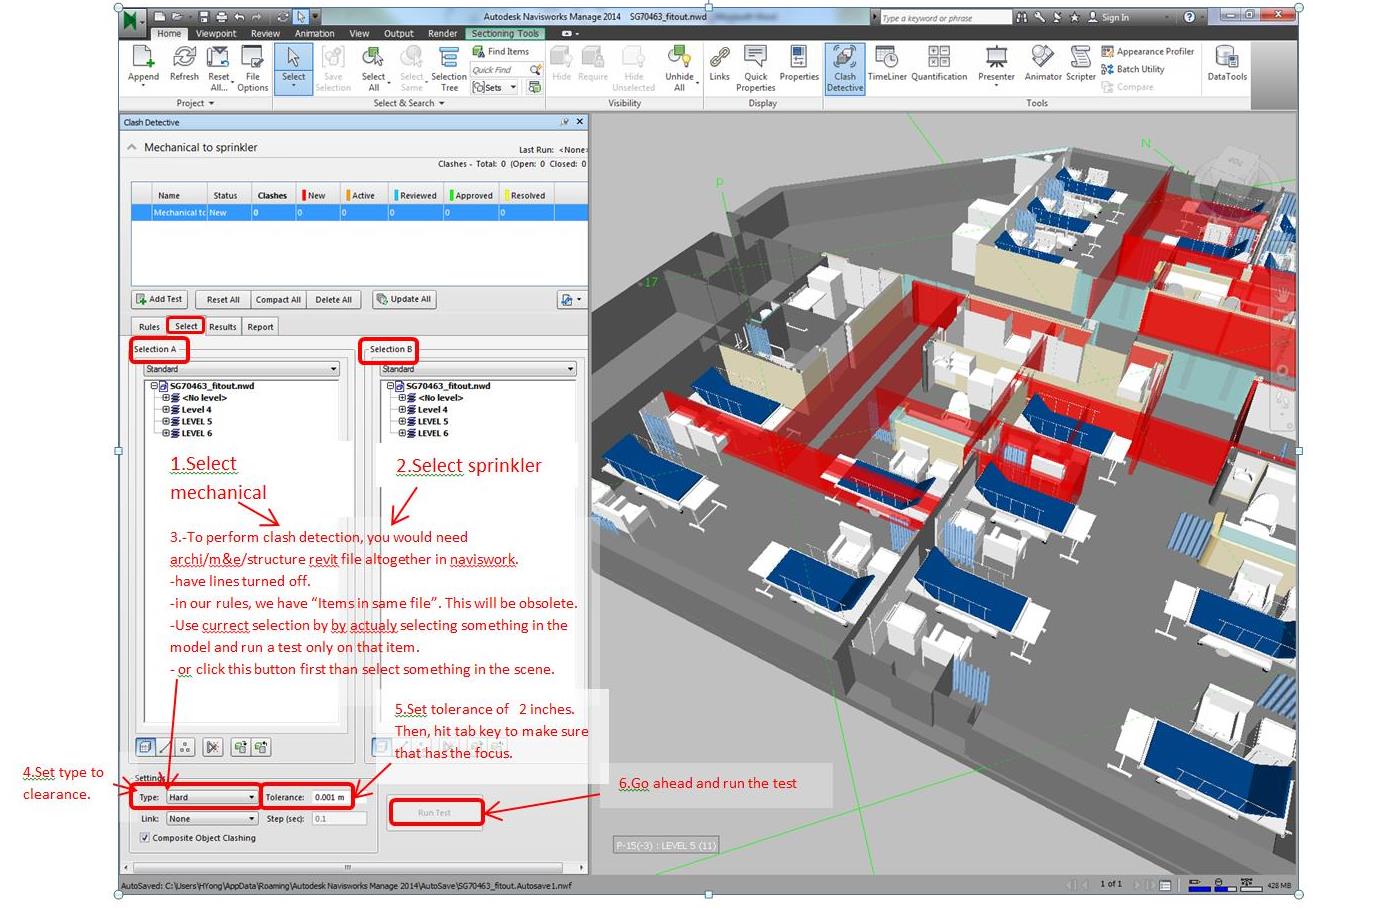
Naviswork manage > Home > tools > clash detective > add test > enter test name eg mechanical to sprinkler > rules tab > check “items in same file” > view  “select”, “ results” , “ report” for other info. 


b. Selecting objects to clash and adding clearances
Select specific objects in those models we want to run the test on.
1.Go to select tab, we have Selection A and Selection B.
In selection A, select mechanical.
2.In selection B, select sprinkler.
3.To perform clash detection, you would need archi/m&e /structure revit file altogether in naviswork.
- have lines turned off
-in our rules, we have “items in same file.” This will be obsolete.
-Use current selection by actually by selecting something in the model and run a test only on that item.
-Click Type button in settings first before
4. Set type to clearance
5. Set tolerance of 2 inches. Then hit tab key to make sure that has the focus
6. Run the test


c. Running the clash
As soon as we identified the clashes, we need to review the problems we are going to have with construction of building. 


Changing background colour in Naviswork


f. Creating reports :Viewpoints


g. Creating reports html for clash detection


Part 5 - Navisworks - Dealing with Objects

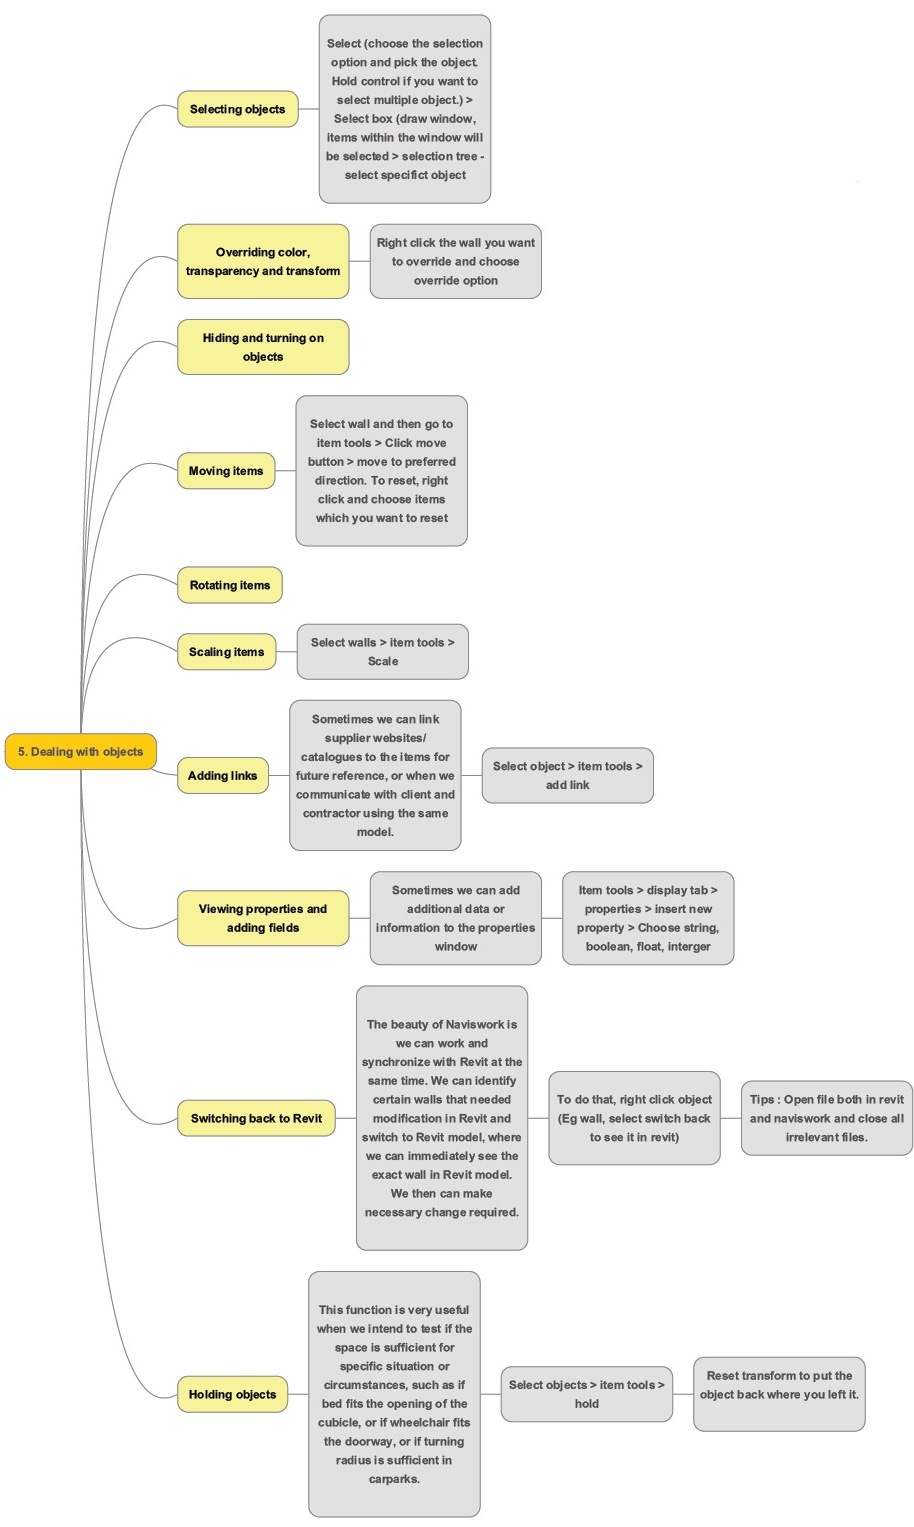
Below is the mindmap of Part 5 - Naviswork - Dealing with objects


1. Selecting object

1. Select (choose the select option and pick the object). Hold control if you want to select multiple object.
2. Select Box (Draw a window, items within the window will be selected)
3. Selection Tree – select specific object


2. Overriding colour, transparency and transform
Right click the wall you want to override and choose override option


3. Moving items

Select walls and then go to item tools > Click move button > move to preferred direction.
To reset , right click and choose items which you want to reset. 

4. Scaling items
Select walls > item tools > scale

5.Adding link
Sometimes we can link supplier websites / catalogues to the items for future reference, or when we communicate with client and contractor using the same model.

Select object > item tools > add link


6. View properties and adding fields
Sometimes we can add additional data or information to the properties window.
Item tools > display tab > properties > insert new property > choose string, Boolean, float, interger


7. Switchback function
The beauty of Naviswork is we can work and synchronise with Revit at the same time. We can identify certain walls that needed modification in Revit and switch to Revit model, where we can immediately see the exact wall in Revit model. We then can make necessary change required.
To do that, we can right click object (eg wall, select switchback to see it in revit).
Tips : Open file both in revit and naviswork and close all irrelevant files. 

8. Holding objects
This function is very useful when we intend to test if the space is sufficient for specific situation or circumstances, such as if bed fits the opening of the cubicle, or if wheelchair fits the doorway, or if turning radius is sufficient in carparks.
Select objects > item tools > hold
Reset transform to put the object back where you left it.  

6. Sorting and Grouping
Right click item > selection inspector > pop up window with selection inspector


Monday, April 4, 2016

An Overview on Naviswork

A while ago, we have been doing some experimental studies on Navisworks. Naviswork is a 3D design review package for Microsoft Windows. Used primarily in constructoion industries alongside with Autodesk Revit, Autocad and Microstation, it allows users to open and combine 3d models, navigate them around in real-time and review the model using a set of tools, including comments, redlining, viewpoings, and measurements. There are also interesting and useful functions such as clash detection, 4dD time simulation. photorealistic rendering and PDF-like publishing.

In our office, we experimented and pilot a project using Naviswork in one of the project which I am handling -- a remodelling of an existing ward in a local hospital, Changi General Hospital, we used Naviswork to monitor on the sequence of constructions (due to site constraint and to shorten time needed for renovation), location of coring etc. Although the scale of the project is very small for Naviswork, it was a good exercise in getting our hands dirty, studying Naviswork as a tool for project management (which I would be sharing in another post).

The overall process / flow of work (in general, not in detail) in carrying out a project utilising various platform (AutoCad, Revit & Naviswork), in this case Ward 15 in Changi General Hospital are as below. There are several back and forthwork involved in Revit and Naviswork since both of this software can be synchronising at the same time and changes can be reflected almost immediately.
Click to View Larger

For now, I would like to share an overview mindmap of Naviswork, constructed as I was studying online via Lynda.com. The tutorials conducted by Eric Wing was amazing.

The mindmap is massive, considering there are many aspects to cover in Naviswork, but trust me, it is rewarding. For the subsequent blogpost, I will be breaking down the mindmaps into smaller mindmaps with screenshots on how I practiced using Naviswork in subsequent blogposts.


Disclaimer : tutorials posted here are just a record on how we practiced and experimented on the software. Please forgive/feedback if there is any error spotted as we are still baby steps in learning.